The Mission: to explore, create and inspire!

thePatientPotter is a blog that is designed to encourage and inspire fellow Potters and Entrepreneurs as it takes them through the challenges and triumphs of a 'potter on a mission'.


Friday, August 26, 2011

Book Review - Carolina Clay

'Carolina Clay by Leonard Todd is a must for anyone wishing to learn of the great enslaved potter, Dave Drake.'  G. Dexter

Carolina Clay: The Life and Legend of the Slave Potter Dave
By Leonard Todd - a decendent of Dave's "owner"

The life of the slave potter Dave unfolds against a backdrop of cruelty, repression, war and unexpected tenderness in this intimate history. Little is known about Dave, whose stunning stoneware vessels are made more exceptional by the fact that he often inscribed verses, usually rhymed couplets, into their wet clay during the era when literacy among blacks was illegal and brutally punished.

My take on the book:
Loved it! Although, not quite what I expected. I expected this to be about Dave and how he made his large, stoneware pots. Actually, very little was said about his or the potteries' processes of which they made their pots - although it does go a little bit into the kiln they used, but at this point, who cares! I learned so much more than I would have imagined. I was gently guided into the life of a slave who broke the rules by writing on his pots! Rules? I mean Laws!

This potter also made pots with only one leg on a kick-wheel, and you'll never guess how. Because he wanted to? Maybe. Because he had to? Yes. This book gives you a rare glimpse into the life of a slave before, during and after the Civil War. A slave under several different owners. It is also a rare glimpse into the world of the potteries of Edgefield, NC, which I loved reading about. Makes me want to go there to check out the place. This book also gives you a little glimpse into the politics of the Civil War and Slavery, which will leave you wondering why most 'Blacks' these days are Democrats instead of Republican.

For the potter, this is a great historical read, for the collector, this is a must read, and for all the other readers, this is an interesting read that you will learn something from.

Sunday, July 10, 2011

Book Review - Dirt for Making Things

Dirt for Making Things: An Apprenticeship in Maricopa Pottery
As told to Janet Stoeppelmann by Mary Fernald
Publisher: Northland Publishing
ISBN: 0-87358-599-2
Price: $14.95


This is my favorite pottery book right now. I've read it 3 times - it is a quick read, and each time I pick it up to read something I am inspired to pinch some pots; to sit back, relax and create a pot with my hands. I highly recommend this book to potters interested in processing their native clay, and hand-building as well as collectors interested in Maricopa pottery and their history.

Theme: This book centers around the Maricopa Indian Potters and their processes for making clay and pottery. The intent of the author was to document the processes that she learned while apprenticing with the Maricopa for future reference should their processes die out.

Character: You get to know Ida Redbird and her cousin Mary Juan, two of the original potters from the 1937-1940 revival period, and Elizabeth Hart who helped them and 18 other Maricopa potters start the Maricopa Pottery Cooperative. You meet Mabel Sunn and her daughter Barbara Johnson, potters who taught the author Maricopa processes.

Content: Full of black & white photos of potters making clay, potters making pottery, potters firing pots and the potters themselves. Full color photos of early and revival period pottery. Illustrated Maricopa designs. And detailed instructions of Maricopa pottery processes.

Writing Style: This book is written in a very personable manner and is only 98 pages (including index). Light reading that packs a powerful punch.

All in all this is a great little book for your pottery library and in my opinion, worth every penny.

Wednesday, July 6, 2011


It Exploded! What do I do now?!?


Yesterday my kiln exploded, died, bit the dust, use whatever descriptive word you want, just make it catastrophic. I like exploded because that’s how it felt.

My kiln didn’t actually explode, but the devastation I saw upon opening the lid hit me like a ton of bricks. Like an explosion.

One of the greatest joys a potter can have is the opening of a kiln after a good fire. It’s like Christmas morning, only better.

Not this time.

This time my kiln wasn’t full of pretty pottery but was empty running a test fire. It was not firing properly and after months of troubleshooting, patching and installing new elements - several times, my kiln was finally running its first test fire. Woo Hoo!

The empty kiln, all patched up with shiny new parts, was going to be the revival of my studio. Coming back to life after 3 years in a coma state. It was going to start living again. I was going to start creating again. 3 years I have waited patiently.

Now what.

My kiln is dead. The automatic shut-off did not work. It way over-fired. It destroyed itself.

Kind of like me 3 years ago when I tore the tendons in both elbows creating pottery. Repeating a process over and over again without rest, until I broke.

I cried yesterday. Soul searching tears. Like a moth to a flame I kept walking back to the garage to take another look. It was true. Still dead. Writing this down today is helping me sort through the questions my mind is relentlessly asking.

Is this karma for not going to church yesterday? Is this a sign I should not go back into pottery? If so then why do I have such passion for it? Does it mean I need to go in another direction with my pottery? Do I save up and buy a new kiln? Do I try and repair this one? What does this mean? Where do I go from here????

Any suggestions?

Photo above by Michelle Rivera

Sunday, July 3, 2011

So How do you Clean Native Clay Anyway?

This is a question I get asked a lot.

Let me show you the process I use and then at the end of this post I will include a link to someone else's process. The two different processes should give you a good idea of what needs to be done.

This is what my native clay looks like fresh off the pile my husband made. Besides your normal pebbles, sand, and impurities, I have crabgrass, bugs and anything else that might find itself on top of a pile of dirt outside.

So What is the Process for Cleaning this Mess?
The first thing I do is dry the clay completely. I have two methods for doing this: Either I spread a wagon-full directly onto my garage floor where the cement will soak up the moisture as it sits underneath my car
or, I keep it parked in the wagon I loaded up for a week or so, breaking up large clumps into smaller clumps as it dries, pulling out the weeds and large pieces of whatever.
I want to end up with a 5 gallon bucket half full of dried clay that looks like this

In another 5 gallon bucket I fill it half full with water and slowly pour the first bucket of dried clay into the second bucket of water. I do not stir the two together but instead let it settle on its own to slake for a few days.

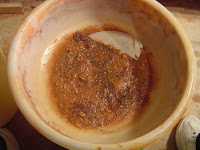
This is what the mixture will end up looking like; silky, sandy, pebbly, muddy, beautiful, slimy clay. Sometimes this mixture can stink if it has a lot of organic material in it. Even though the organic material will burn out in the kiln, you don’t want too much of it in your clay.

Next, I take the first 5 gallon bucket, which is empty now, and put a 80 mesh sieve which is designed to sit on top of a 5 gallon bucket, then scoop in enough slaked clay to fill the screen about ¼ of the way. I fill up a smaller, regular bucket with clean water and set that next to this bucket. I grab a seat and settle in for some soul-searching cleaning time.

Add clean water to the slaked clay and take a rib and scrape the sand from the top of the screen back and forth, so the clay can be washed through the screen. Back and forth, back and forth adding clean water as it flows through the screen. Keep adding clean water until you think all of the clay has been washed out.

This is what I have left in my sieve when I am done washing. Sand, pebbles and debri. This I set aside to be used as grog on hand-built projects (I'll post about this later).

Let the washed clay set for several days so that the clay settles and the water becomes clear on top. Then pour that water back into the small bucket to be used next time. Pour off this water slowly so as not to disturb the settled clay.

Stir up your clean clay and then pour into some plaster bats.The bats will remove the excess water and leave you with wonderful native clay.

The bats will remove the excess water and leave you with wonderful native clay.


The only item I needed to purchase to wash my clay was the sieve. I had tried the window screen as others have mentioned but did not like using it. The screen I used also let too much sand pass through. I have a lot of sand in my clay so I spent some time researching trying to figure out what size mesh I should use to get the right amount of sand removal. I finally decided to try 3 sizes; 60, 80 and 100 mesh. The eighty works well for my needs.

That's it. That's my process. I have each phase of this process going at any given time so that I always have clay available when I need it. Now here is the link to the other process that I promised you. Have fun!

If you have a different process for cleaning your native clay, mind sharing?

Monday, June 20, 2011

My Indian Phase


Looking through archived photos of my Indian pottery, memories of a simple lesson learned came flooding back.

My ‘Indian Phase’ was a time that was full of learning, enthusiasm and excitement. We had been in Oklahoma for about 2 years; so we were settled in but still exploring. By this time my studio was up and running and my husband had already discovered my red clay and I was using it in my studio. Above is the first pot I ever made with my new clay. Notice the Indian motifs.


Oklahoma is Indian country, rich in Indian history and my surroundings started to influence my pottery.

Between the ‘Trail of Tears’ and the Indian war with the United States, this part of the country was actually Indian Territory before it became a state in 1907. Not having lived among Indians before, Indian history naturally became something I wanted to explore - and what better way to explore then with my pottery.

Wanting to honor the local Indians by including their designs on my pots, I started looking for pottery that the local Sac and Fox tribe had made. I searched and searched and wasn’t able to find anything. I found this rather odd since didn’t all Indians make pottery back in the day? Well, yes and no.


Volunteering at the Lincoln County Museum around this time, I met a woman who was very knowledgeable in the local Indian history and she explained why I couldn’t find any pottery made by the Sac and Fox tribe.

The Sac and Fox is a Woodland tribe from the North. Pottery was never their thing.

Yes, they are in Oklahoma now, but they were originally from the Wisconsin-Michigan area and became transplants to Oklahoma as a result of wars with the United States. They were hunters and gatherers, and although they made some pottery, they considered it a liability because it was heavy and cumbersome to carry.
All foods are displayed in historically based containers - wooden bowls, bark containers, turtle shells, baskets, gourd containers, pottery, and/or trade brass, copper, and iron kettles.

She directed me to a poster that showed some of the designs the Sac and Fox tribe used on clothing and shoes. As you can see their designs incorporated the flowers and foliage that they associated with in the northern woodlands.
As I learned the history of the local Indian tribe, as well as other tribes transplanted to Oklahoma, my Indian pottery naturally took on a whole new look and feel.
Like anything else creative, pottery is a way to express whatever feeling we are experiencing in the space of time that we allow those feelings to exist. In writing this post I was amazed to see how much my Indian pottery had changed once I had explored my subject. Knowledge is quite powerful.

mission: to explore, create and inspire!

Friday, June 3, 2011

Why I like digging my own clay


In the past I have had trouble explaining, in a condensed version, why I enjoy digging my own clay. There were just so many reasons for it and I found it very hard to describe the feelings that come from the process of mining one's own clay.

Until one day...

... when I joined a blog community challenge that forced me to write a blog post containing a list.

Perfect!

A list allows me to pinpoint specific reasons, one-by-one. And, the timing could not be better. This topic recently came up in a pottery group I belong to so the question is out there and it needs to be answered.

So, Here Goes.

10 Reasons I Like Digging My Own Clay

1. I feel one with nature: the process of digging, cleaning, shaping, firing, and using the end product brings me closer to mother nature and her contributions to life.

2. There is great satisfaction knowing that if the whole industrialized nation around me collapsed, I would still be able to make pots.

3. I feel honored that I am able to give a tangible piece of Oklahoma to someone who cherishes the piece as a memento.

4. I love the fact that I can make something beautiful and useful out of something that is normally a 'sticky, staining, red, messy, pain in the butt!'.

5. The whole process of digging, cleaning and pulverizing the clay is soothing to my soul. It's very rythmic and sends my mind wandering to all sorts of different places.

6. Designing my own clay from scratch gives me a built-in niche that no one else can duplicate unless I want them to.

7. I can design my clay to meet my specifications. I can make simple versions, complex versions, and many in-between versions.

8. My pottery has a story to tell. Everyone loves a good story.

9. I feel a special kinship with the potters of long ago, who knew no other way than to dig their own clay.

10. And, last but not least, I love that my husband is the one who found my clay and saved every last ounce of it for me.


Have I left any out? If so, let me know.